Ok, here's the truth, don't waste your time downloading firmware updates or unscrambling about if there are USB 2.0 or 3.0 ports. If you have a newest pc or laptop desinged for run Windows 10, you need understand that WINDOWS 7 NOT HAVE USB 3.0 DRIVERS. In thar order of ideas here's the solution:
1) Take on hand a USB pen drive, 4GB prefered.
2) Download Windows USB/DVD Download Tool https://www.microsoft.com/es-es/download/details.aspx?id=56485
3) Create a Bootable USB Windows 7 installer (You need a ISO installer)
4) Download THIS GREAT TOOL Intel USB 3.0 Creator Utility (thanks to GIGABYTE)
https://www.gigabyte.com/Motherboard/GA-Z170X-Gaming-G1-rev-10#support-dl-utility
5) Run it, and Magically you can move your MOUSE and typing your KEYBOARD
lunes, 29 de octubre de 2018

viernes, 12 de octubre de 2018
Export and Import Dial-up and VPN Settings in Windows
Most of us don’t really need to create dial-up connections on Windows
operating system anymore, thanks to routers which is very commonly
being used today. Once the router is configured, it will automatically
connect to the Internet when it is turned on and the computer that is
connected to the router can instantly use the Internet connection.
However, I still have a DSL modem that I have to manually connect through dial-up which is very useful to troubleshoot Internet connectivity problems to determine if it is the router or ISP’s fault. Other than that, VPN connections that uses PPTP and L2TP also needs to be configured from the same area where you create dial-up connections that is in the Network and Sharing Center.
If you have previously setup a lot of VPN connections by saving the username, password and the VPN address in Windows, you may want to look for an automated way to export the VPN settings and then import it to another computer so that you don’t need to manually recreate the connections again. Here is how you can backup and restore the connection settings in Windows.
To backup dial-up connections and VPN settings:
1. Press Win+R to bring up with Run window, type %appdata% and hit Enter.
2. Go to Microsoft > Network > Connections and backup the Pbk folder.

To restore the dial-up connections and VPN settings, simply overwrite the Pbk folder that you’ve backed up to the existing Pbk folder. Do take note that this will only restore the connection settings without the username and password because the credentials are tied to the unique SID (Security Identifier) and owner on the computer.
Theoretically you can change the SID, computer name, and user account name to match the old one so that the username and password are restored together with the connection settings but I won’t recommend you to do that unless you’re on a clean Windows. Another problem is a tool developed by Sysinternals called NewSID to change SID does not work on Windows 7. Sysprep only changes to a random SID but does not allow you to specify a SID. Ghost Walker works on Windows 7 but it is only bundled in their Ghost shareware.
What you can do is to use a tool called Dialupass by Nir Sofer to extract the username and password from the rasphone.pbk file and then manually key in the username and password on your connections.

Read More: https://www.raymond.cc/blog/export-and-import-dial-up-and-vpn-settings-in-windows/
However, I still have a DSL modem that I have to manually connect through dial-up which is very useful to troubleshoot Internet connectivity problems to determine if it is the router or ISP’s fault. Other than that, VPN connections that uses PPTP and L2TP also needs to be configured from the same area where you create dial-up connections that is in the Network and Sharing Center.
If you have previously setup a lot of VPN connections by saving the username, password and the VPN address in Windows, you may want to look for an automated way to export the VPN settings and then import it to another computer so that you don’t need to manually recreate the connections again. Here is how you can backup and restore the connection settings in Windows.
1. Press Win+R to bring up with Run window, type %appdata% and hit Enter.
2. Go to Microsoft > Network > Connections and backup the Pbk folder.
To restore the dial-up connections and VPN settings, simply overwrite the Pbk folder that you’ve backed up to the existing Pbk folder. Do take note that this will only restore the connection settings without the username and password because the credentials are tied to the unique SID (Security Identifier) and owner on the computer.
Theoretically you can change the SID, computer name, and user account name to match the old one so that the username and password are restored together with the connection settings but I won’t recommend you to do that unless you’re on a clean Windows. Another problem is a tool developed by Sysinternals called NewSID to change SID does not work on Windows 7. Sysprep only changes to a random SID but does not allow you to specify a SID. Ghost Walker works on Windows 7 but it is only bundled in their Ghost shareware.
What you can do is to use a tool called Dialupass by Nir Sofer to extract the username and password from the rasphone.pbk file and then manually key in the username and password on your connections.
Read More: https://www.raymond.cc/blog/export-and-import-dial-up-and-vpn-settings-in-windows/
viernes, 23 de marzo de 2018
How to Remove or Delete Digital Signature from PDF Document
Not only permissions password can restrict editing on PDF document, but also digital signature would make signed PDF document not editable.
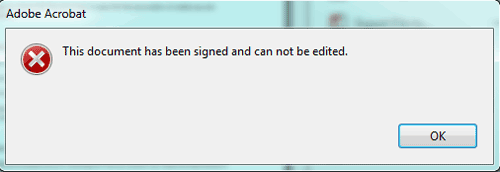
But if I want to edit PDF document after it is signed with digital ID, how can I do to remove edit restrictions from signed PDF document?
Following passage will show you how to do by PDF document conversion. And then list some other opinions about removing PDF document digital signature from Internet for reference.
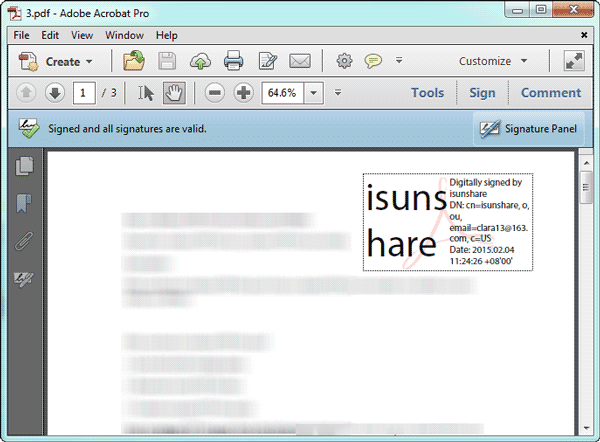
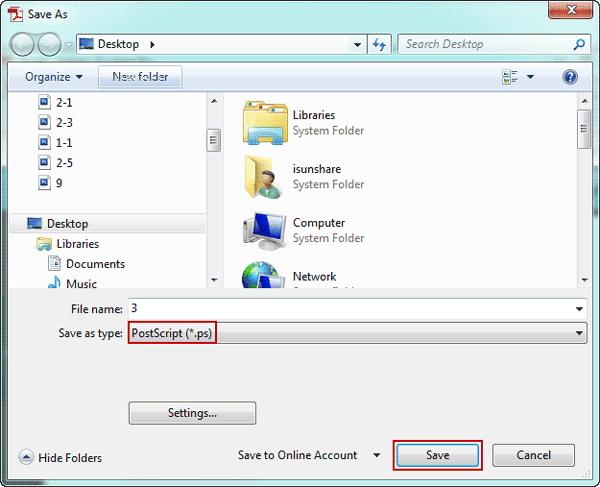
1-2 Click File > Save As and choose file type PostScript (*.ps) in Save As window, and click Save button.
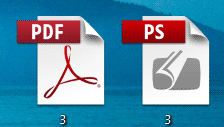
Then you can see PS file in the location you select to save it.
3-2 Turn to Tools > Content Editing, choose digital signature in PDF document and delete it.
Tips:
If you have interactive elements such as form fields, buttons, hyperlinks, etc. in your PDF that you want to preserve, please be careful to export PDF to a PostScript file. And when you set a name for PostScript file, please use a name different from original PDF file, in order to prevent overwriting your original PDF file when redistilling.
Besides, some other opinions or ways from Internet might help you to find more choices to delete or remove PDF document digital signature.
1. To clear a digital signature, right-click the field and select Clear Signature.
2. To remove the field, active the Select Object tool, click field to select it, and then delete it.
So it is always recommended that whenever we are applying signatures on a PDF file, always keep a backup of the original file with a different name or at a different location.
If the signature is applied on the first time the PDF was created, you will need to find the signature field and delete the value.
If the signature is added to PDF document after PDF creation, you should go back to the previous version of PDF document in order to remove digital signature.
If there is more than one signature in the document, you will only be able to remove the most recent signature so that other signatures do not get invalidated. To remove most recent signature, you will have to revert back to the version before this most recent signature is applied. If you want to remove an older signature, you will need to remove all counter signatures that were added after.
After all, which one can work for your signed PDF file? It depends on your PDF file digital signatures and how do you want to remove or delete it. But the way talked first is workable without any doubts.
But if I want to edit PDF document after it is signed with digital ID, how can I do to remove edit restrictions from signed PDF document?
Following passage will show you how to do by PDF document conversion. And then list some other opinions about removing PDF document digital signature from Internet for reference.
Delete Digital Signature from PDF Document by Conversion between PDF and PS
Step 1: Export the signed PDF document as a PostScript file.
1-1 Open signed PDF file with Adobe Acrobat Pro.1-2 Click File > Save As and choose file type PostScript (*.ps) in Save As window, and click Save button.
Then you can see PS file in the location you select to save it.
Step 2: Convert the PS file back into PDF.
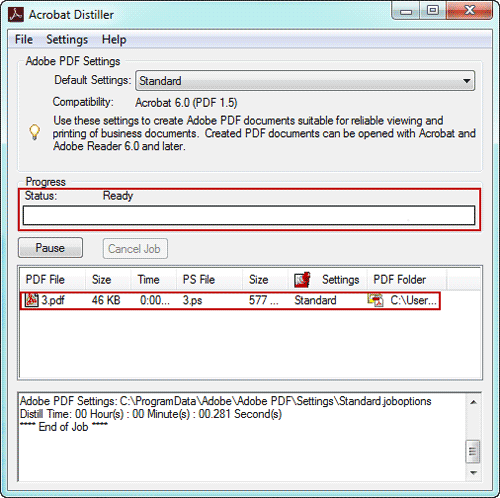
Double click PostScript file you just got. And it will be converted into PDF by Adobe Distiller. You can see the conversion progress in the Acrobat Distiller window. Until the status becomes ready, a PDF file can be viewed there.Step 3: Open converted PDF file and delete digital signature.
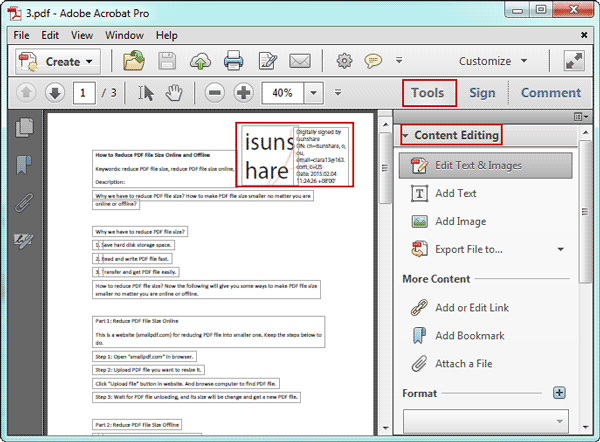
3-1 Click the new PDF file in Adobe Distiller and open it with Adobe Acrobat Pro. You can see the blue pane has disappeared from the top of original document. And signature has become editable like other PDF document content.3-2 Turn to Tools > Content Editing, choose digital signature in PDF document and delete it.
Tips:
If you have interactive elements such as form fields, buttons, hyperlinks, etc. in your PDF that you want to preserve, please be careful to export PDF to a PostScript file. And when you set a name for PostScript file, please use a name different from original PDF file, in order to prevent overwriting your original PDF file when redistilling.
Besides, some other opinions or ways from Internet might help you to find more choices to delete or remove PDF document digital signature.
Opinion 1: Two steps to delete PDF digital signature
A digital signature field can be removed like any other form field, if you were the one who signed it or otherwise have access to private key.1. To clear a digital signature, right-click the field and select Clear Signature.
2. To remove the field, active the Select Object tool, click field to select it, and then delete it.
Opinion 2: Removing PDF signature asks for right to edit PDF file
In case you have the rights to edit that PDF file, in that case you can remove the signature fields by taking the PDF in the form editing mode. This would be the easiest way to remove PDF digital signature. But at most of time, you don’t have the rights.So it is always recommended that whenever we are applying signatures on a PDF file, always keep a backup of the original file with a different name or at a different location.
Opinion 3: How to remove digital signature from PDF when it is signed with several signatures
This opinion is worth to be thought about and tried. Removing digital signature from PDF document depends on when the signature is added or applied to PDF document.If the signature is applied on the first time the PDF was created, you will need to find the signature field and delete the value.
If the signature is added to PDF document after PDF creation, you should go back to the previous version of PDF document in order to remove digital signature.
If there is more than one signature in the document, you will only be able to remove the most recent signature so that other signatures do not get invalidated. To remove most recent signature, you will have to revert back to the version before this most recent signature is applied. If you want to remove an older signature, you will need to remove all counter signatures that were added after.
After all, which one can work for your signed PDF file? It depends on your PDF file digital signatures and how do you want to remove or delete it. But the way talked first is workable without any doubts.
jueves, 10 de agosto de 2017
Windows Spotlight Not Working in Windows 10
1)Run Command Prompts as administrator
a) Type CMD in search box from Start menu
b) Right-click on Command Prompts app on the top and click Run as administrator
c) Click YES when prompted by UAC ( USER ACCOUNT CONTROL )

2) Type the commands blow and hit Enter one by one
a) Type dism /online /cleanup-image /restorehealth and hit Enter
b) Type sfc /scannow and hit Enter
c) Type powershell and hit Enter
d) Type Get-AppXPackage -AllUsers |Where-Object {$_.InstallLocation -like “*SystemApps*”} | Foreach {Add-AppxPackage -DisableDevelopmentMode -Register “$($_.InstallLocation)\AppXManifest.xml”} and hit Enter

Now press WIN + L keys to lock screen and check. You should be able to see Windows Spotlight screen now.
a) Type CMD in search box from Start menu
b) Right-click on Command Prompts app on the top and click Run as administrator
c) Click YES when prompted by UAC ( USER ACCOUNT CONTROL )
2) Type the commands blow and hit Enter one by one
a) Type dism /online /cleanup-image /restorehealth and hit Enter
b) Type sfc /scannow and hit Enter
c) Type powershell and hit Enter
d) Type Get-AppXPackage -AllUsers |Where-Object {$_.InstallLocation -like “*SystemApps*”} | Foreach {Add-AppxPackage -DisableDevelopmentMode -Register “$($_.InstallLocation)\AppXManifest.xml”} and hit Enter
Now press WIN + L keys to lock screen and check. You should be able to see Windows Spotlight screen now.
lunes, 13 de marzo de 2017
Borrar unidades de red que no se quieren desconectar
net use * /d /y
eliminara todos los recursos de red, despues para visualizar las conexiones existente:
net use * /d /y >nul
eliminara todos los recursos de red, despues para visualizar las conexiones existente:
net use * /d /y >nul
No abre el menú de inicio en Windows 10
Abrimos Windows
PowerShell, para abrirlo, pulsamos con el botón derecho del ratón sobre el icono de Windows del Menú Inicio, seleccionamos Símbolo del sistema (administrador), escribimos Powershell y pulsamos sobre la tecla Enter.

Ahora, tendremos que introducir el siguiente comando:

Espere a que PowerShell se ejecute y complete la instrucción ignorando los errores que puedan aparecer en color rojo. El proceso puede tomar unos 15 minutos. Una vez haya terminado reinicie el equipo, luego haga clic sobre el Menú Inicio, si abre entonces el problema se habrá solucionado. Si no, otra alternativa es crear una nueva cuenta de usuario en el dispositivo con Windows 10.

Ahora, tendremos que introducir el siguiente comando:
Get-AppXPackage | Foreach {Add-AppxPackage -DisableDevelopmentMode -Register "$($_.InstallLocation)\AppXManifest.xml"}

Espere a que PowerShell se ejecute y complete la instrucción ignorando los errores que puedan aparecer en color rojo. El proceso puede tomar unos 15 minutos. Una vez haya terminado reinicie el equipo, luego haga clic sobre el Menú Inicio, si abre entonces el problema se habrá solucionado. Si no, otra alternativa es crear una nueva cuenta de usuario en el dispositivo con Windows 10.
jueves, 2 de febrero de 2017
How to Install Windows 10 on External Hard Drive
Steps to install Windows 10 on external hard drive
Step1. Format the external hard drive with NTFS and connect it to your computer. Click Start button and input "CMD" in the search box, and then click "cmd.exe" to launch the Windows PowerShell prompt. Once the Command prompt window pops up, input "diskpart".
Step2. Input the command line "disk list" then press Enter button, after that all the drives of the host computer will be listed. As you can see in the following picture, Disk 1 is the destination external hard drive for WTG in this example.

Step3. Enter the command lines in the picture below. This will clean the partition first, then a primary partition will be created. After that, the rest of the command lines will format the external hard drive and activate the partition on it. The last step is to assign the drive letter, here we choose E as the drive letter.

Step4. Open "Dism.exe" to extract the install.wim file from drive F and move it to E drive (the destination USB hard drive), please refer to the command line in the picture below.

Step5. Enter the final command line ”bcdboot e:\\windows /s e: /f ALL” to ensure the USB hard drive bootable. Here ends the whole process.
lunes, 28 de noviembre de 2016
This app has been blocked for your protection' error.
Windows 10 brings a host of security enhancements to prevent
unauthorised intrusion into the operating system (OS) and user files.
However, this mechanism could sometimes block or flag legitimate
programs and apps from functioning properly.
Affected Windows 10 users may encounter interference with the execution of normal Windows programs in the form of persistent error messages such as: "This app has been blocked for your protection".
In other words, the issue can interfere with the execution of setup files of a program that you wish to install, wherein you cannot run the setup.exe file even after using elevated Administrator permissions with User Account Control (UAC).
At this moment, you will see an error message with the following subtext:
"An administrator has blocked you from running this app. For more information, contact the administrator."
Here are a few simple steps to bypass or circumvent the "protection error" in Windows 10, after enabling the hidden Administrator account:
Step 1: Launch Start Menu, search and select Command Prompt. Then right-click on it and choose Run as Administrator from the context menu.
Step 2: Type the following command without quotes at the Command Prompt and then hit Enter:
net user administrator /active:yes
You should see the message saying "command completed successfully".
Step 3: Launch Start Menu once again and right-click on user-account title at the top-left of the screen. Then click Sign-out.
Step 4: At the login screen, log into the Administrator account and you will return to the Desktop of that user profile.
Step 5: Locate and run the .exe file for the program which you want to install.
Step 6: As you have already logged into the Administrator account, the Smartscreen protection will be disabled and the installation should complete successfully.
Step 7: After you have completed the installation, just log back into your regular account after logging out of the Admin account.
Step 8: Finally, disable the Administrator account that was used earlier to prevent malicious access to your system files from external sources like hackers and cyber-criminals.
Just execute the following command (without quotes) to accomplish this feat from Command Prompt: "net user administrator /active:no"
Affected Windows 10 users may encounter interference with the execution of normal Windows programs in the form of persistent error messages such as: "This app has been blocked for your protection".
In other words, the issue can interfere with the execution of setup files of a program that you wish to install, wherein you cannot run the setup.exe file even after using elevated Administrator permissions with User Account Control (UAC).
At this moment, you will see an error message with the following subtext:
"An administrator has blocked you from running this app. For more information, contact the administrator."
Here are a few simple steps to bypass or circumvent the "protection error" in Windows 10, after enabling the hidden Administrator account:
Step 1: Launch Start Menu, search and select Command Prompt. Then right-click on it and choose Run as Administrator from the context menu.
Step 2: Type the following command without quotes at the Command Prompt and then hit Enter:
net user administrator /active:yes
You should see the message saying "command completed successfully".
Step 3: Launch Start Menu once again and right-click on user-account title at the top-left of the screen. Then click Sign-out.
Step 4: At the login screen, log into the Administrator account and you will return to the Desktop of that user profile.
Step 5: Locate and run the .exe file for the program which you want to install.
Step 6: As you have already logged into the Administrator account, the Smartscreen protection will be disabled and the installation should complete successfully.
Step 7: After you have completed the installation, just log back into your regular account after logging out of the Admin account.
Step 8: Finally, disable the Administrator account that was used earlier to prevent malicious access to your system files from external sources like hackers and cyber-criminals.
Just execute the following command (without quotes) to accomplish this feat from Command Prompt: "net user administrator /active:no"
miércoles, 13 de julio de 2016
Entendiendo el licenciamiento OPEN VALUE de Microsoft
https://blogs.msdn.microsoft.com/mssmallbiz/2007/08/22/understanding-open-value-item-descriptions-and-pricing-part-1/
lunes, 4 de julio de 2016
Arreglar POP3 y SMTP de Outlook.com
Cada vez que abres Outlook y comienza a hacer la sincronización de correo
electrónico te aparece la ventana de Nombre de usuario y contraseña como si algún
dato de esos estuviese mal?
Bueno, aquí viene la solución. Debido a que Outlook se actualizo, deshabilita el servidor POP por defecto, así que lo único que debemos hacer es lo siguiente:


Bueno, aquí viene la solución. Debido a que Outlook se actualizo, deshabilita el servidor POP por defecto, así que lo único que debemos hacer es lo siguiente:
1.
Entrar a Outlook.live.com y logearnos con nuestras
credenciales
2.
Ir al engranaje e ir a "OPCIONES"
3. Ir a "Cuentas" y luego a "POP e IMAP"
4. En "Opciones de POP" darle "SI" en "Permitir que los dispositivos y las aplicaciones utilicen POP, dar click en "GUARDAR" y listo, abrimos nuestro Outlook y problema resuelto.
Suscribirse a:
Entradas (Atom)