domingo, 2 de agosto de 2020

Install or Uninstall Connect Wireless Display Feature in Command Prompt

1 Open an elevated command prompt.

2 Copy and paste the command you want to use into the elevated command prompt, and press Enter. (see screenshots below)

(Install)
DISM /Online /Add-Capability /CapabilityName:App.WirelessDisplay.Connect~~~~0.0.1.0

OR

(Uninstall)
DISM /Online /Remove-Capability /CapabilityName:App.WirelessDisplay.Connect~~~~0.0.1.0

3 When the operation completed successfully, you can close the elevated command prompt if you like.

jueves, 18 de junio de 2020

Cómo ver carpetas compartidas Windows Server 2019, 2016, 2012

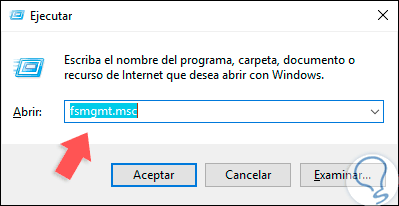
Para este método debemos combinar las teclas siguientes y en la ventana emergente ejecutamos el siguiente comando:

 + R
fsmgmt.msc
7-Ver-carpetas-compartidas-usando-el-comando-Ejecutar-en-Windows-Server-2019,-2016,-2012.png

Como ocultar la lista de usuarios en Windows Server 2019

Si la pantalla de Bienvenida de Windows Server te aparece asi:


Y no quieres que aparezcan el resto de usuarios a un lado, la solución es bastante simple:

Abres el editor de politicas de grupo (gpedit.msc) >>> Computer Configuration -> Windows Settings -> Security Settings -> Local Policies -> Security Options. Enable the policy “Interactive logon: Do not display last user name”. por defecto esta deshabilitada:

  • Interactive logon: Don’t display last signed-in: Disabled
  • Interactive logon: Don’t display username at sign-in: Disabled


viernes, 17 de abril de 2020

How to Clone Your Raspberry Pi SD Card

Raspberry Pis can be fickle. If you’ve ever gotten a corrupt SD card from a power outage, bad cable, overclocking, or other issue, you know how annoying it can be to start from scratch. But we can fix that.

How This Works

I’ve had this happen all too often, and I eventually figured out a good solution. Once I set up my Pi project exactly how I want it, I just use Win32 Disk Imager on Windows to clone an image of its SD card onto my PC. There I keep it, safely, until something goes wrong with my Pi. When that happens, I can just re-clone that image to the SD card, overwriting the broken or corrupt version, and I’m be back up and running in no time. (If you don’t use Windows, you can do something similar on Linux with the dd command.) It’s so simple, every Raspberry Pi user should do it.
This works best with those Pi projects that require initial setup and then just run in the background, doing their thing. If you ever make changes to the Pi project, you’ll need to re-clone the image, but with a lot of projects, this is perfect. For example, I use this technique for my two Raspberry Pis running Kodi—if either ever goes down, I can just re-clone my personal image, and the boxes are back up and running in no time, grabbing up-to-date library data from my home server and MySQL database as if nothing ever happened.
And as a bonus, you can more easily share your Raspberry Pi projects by just writing your cloned image out to a new SD card (or sharing the image itself).
Here’s how to do it.

How to Back Up Your Raspberry Pi Project

When your Pi is set up exactly as you want, shut it down and remove its SD card. Plug the SD card into your computer, download Win32 Disk Imager (if you haven’t already), and start it up. If you don’t have a reader built in to your PC, you’ll need to buy one. We recommend something like this Anker 8-in-1 reader ($10) because you can also use it for different SD formats.
Note: If your Pi project is Linux-based (as many are), you may get a warning that the SD card is unreadable by Windows, and needs to be formatted. That’s okay, don’t format it! Just close the window and move on with the process.
In Win32 Disk Imager, click the blue folder button to select the location for the image you’re going to create. I’ve given mine a name that lets me know which project and Pi in my house it’s for.

Next, choose your Pi from the “Device” dropdown. If your Pi has multiple partitions, choose the first one—but don’t worry, this process will clone the entire card, not just the individual partition.

When you’re done, click the “Read” button. This reads the SD card’s data, turns it into an image, and saves that image at the specified location. Note that this process can take a while. As in, up to an hour or more depending on the size of your SD card.

When that’s finished, pop the card back into your Pi and continue as normal! That project is now backed up to your PC.

How to Restore Your Raspberry Pi Project

Now, if something goes wrong with your card, you can restore it just as easily. First, erase your SD card using these instructions.
With your erased card still inserted into your PC, open Win32 Disk Imager again. This time, click the blue folder and navigate to your saved image. Choose your SD card from the dropdown the same way you did before.

When you’ve got it set up, click the “Write” button. This overwrites the SD card’s data with data from the cloned image.

Note that you’ll probably need to use the same SD card—or at least the same model of SD card—for best results. One brand’s 8GB card may be a slightly different size than another brand’s 8GB card, and if the destination card is smaller than the card the image was created from, it won’t work. (Cloning to a larger card should work fine, though.)
jueves, 26 de marzo de 2020

Cómo activar o desactivar asistencia remota Windows 10

Aunque Teamviewer y Anydesk son buenas aplicaciones para acceso remoto (Una mejor que la otra), Encontré que la Asistencia Remota de WIndows hace exactamente lo mismo pero mejor, En las nuevas ediciones de Windows 10, se integra la aplicación moderna de "Asistencia rápida”.

Podemos accesar a ella de dos maneras, la primera, mi preferida (Comandos), Inicio > Ejecutar > msra.exe.
MSRA = MicroSoft Remote Asistant.

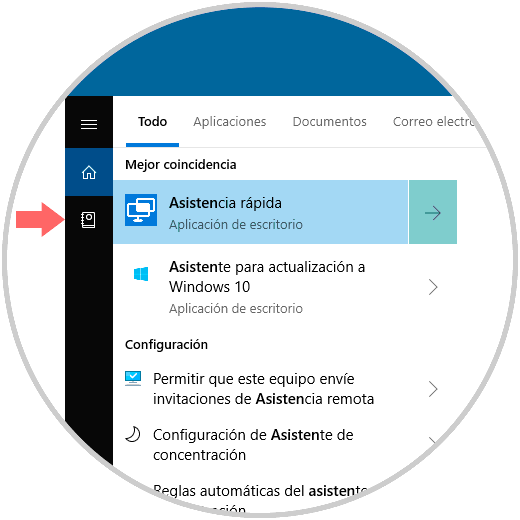
La segunda, simplemente oprimimos la tecla Windows y escribimos "Asistencia rápida" o "Quick Assist"

1-Asistencia-remota.png

Pero antes de hacerlo debemos habilitar dicha asistencia a nuestro equipo para ello hacemos lo siguiente:

Paso 1

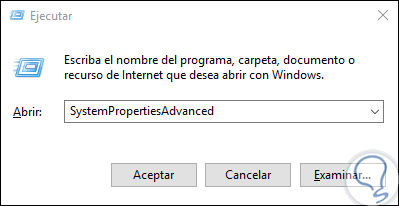
Inicio > Ejecutar > SystemPropertiesAdvanced

2-SystemPropertiesAdvanced.png


Paso 2

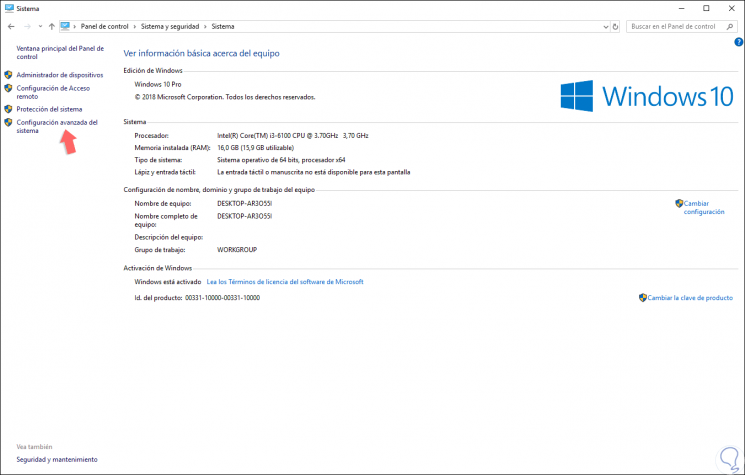
La segunda alternativa es ir a la siguiente ruta del panel de control:
  • Panel de control
  • Sistema y seguridad
  • Sistema


Paso 3

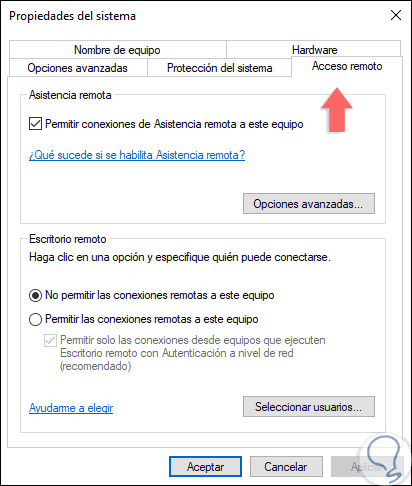
Allí damos clic en la línea “Configuración avanzada del sistema” en el costado lateral izquierdo. En la ventana desplegada iremos a la pestaña “Acceso remoto” donde veremos lo siguiente:

4-pestaña-“Acceso-remoto”.png

Paso 4

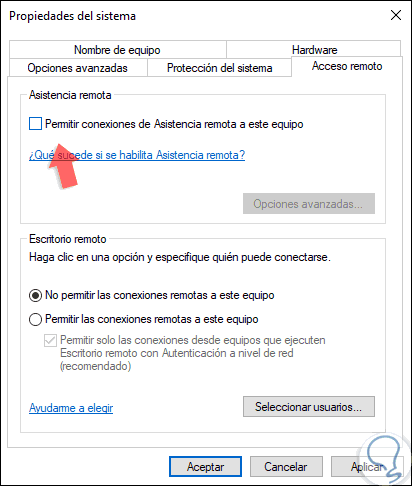
Podemos ver que la casilla “Permitir conexiones de Asistencia remota a este equipo” se encuentra activa por defecto, basta con desactivar esta casilla para inhabilitar esta función. Pulsamos en Aplicar y Aceptar para guardar los cambios.


5-Permitir-conexiones-de-Asistencia-remota-a-este-equipo”.png


2. Activar Asistencia rápida usando Propiedades del sistema Windows 10


Paso 1

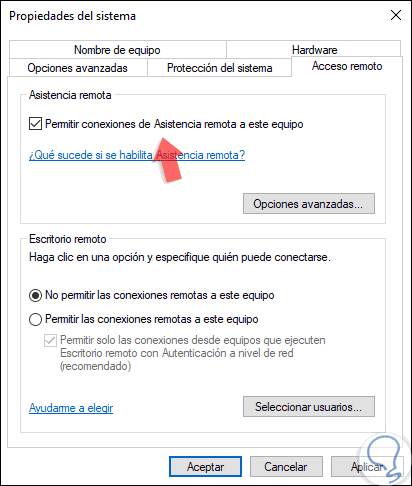
Si por alguna razón es necesario activar esta funcionalidad, debemos ir a la ruta mencionada anteriormente y activar la casilla “Permitir conexiones de Asistencia remota a este equipo” y podremos ver que el botón “Opciones avanzadas” se activa:

6-Permitir-conexiones-de-Asistencia-remota-a-este-equipo.png


Paso 2

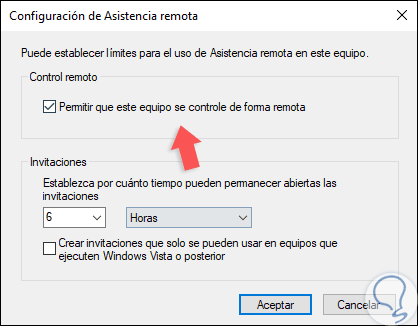
Al pulsar allí será posible configurar aspectos de la conexión remota como. Allí definimos los parámetros deseados y pulsamos en Aceptar para aplicar los cambios.
  • Permitir o no el control remoto del equipo (teclado, mouse, etc)
  • Limitar el tiempo en el cual estarán disponibles las invitaciones de soporte remoto
  • Crear invitaciones solo para un tipo de sistema en especial


7-configurar-aspectos-de-la-conexión-remota-como.png